Microwave Meal Prep for Tiny Kitchens: A Remote‑Worker’s Guide to Fast, Nutritious Lunches
— 8 min read

Imagine you’re juggling a Zoom call, a deadline, and a rumbling stomach - all inside a studio that barely fits a couch. The solution? A microwave that works like a culinary Swiss Army knife. In 2024, more remote workers than ever are turning this humble appliance into a full-on lunch lab, saving space, time, and electricity while still eating balanced meals. Below you’ll find a step-by-step playbook that treats your microwave like a sous-chef, complete with tasty recipes, energy stats, and a few “watch out!” tips.
The Space-Saving Mindset: Why Microwaves Rule Tiny Kitchens
Microwaves let you cook nutritious lunches in a studio apartment without crowding the limited countertop or draining the electricity bill. In a space under 300 sq ft, a microwave occupies roughly 2 sq ft, leaving room for a tiny fridge, a coffee maker and a single cutting board.
Energy consumption is another advantage. A typical 1,000-watt microwave uses about 0.2 kWh for a five-minute reheating cycle. By comparison, a 1-kilowatt electric stove runs for the full cooking time, often 15-20 minutes, consuming up to 0.5 kWh per meal. Over a week, the microwave can save up to 2 kWh, equivalent to the cost of a single cup of coffee.
Microwave cooking also reduces the need for multiple pots, pans and cleaning supplies. A single microwave-safe bowl can serve as the cooking vessel, the storage container, and the reheating dish. For remote workers who spend 8-10 hours at a desk, fewer dishes mean less time spent in the kitchen and more time focusing on tasks.
Key Takeaways
- A microwave occupies minimal countertop space and consumes less electricity than a stovetop.
- One bowl can replace multiple pots, cutting down on cleanup.
- Energy savings add up to roughly 2 kWh per week for a typical remote-worker lunch routine.
Transition: Now that we’ve secured the why, let’s explore the what - building a nutritionally solid bowl that fits in a single container.
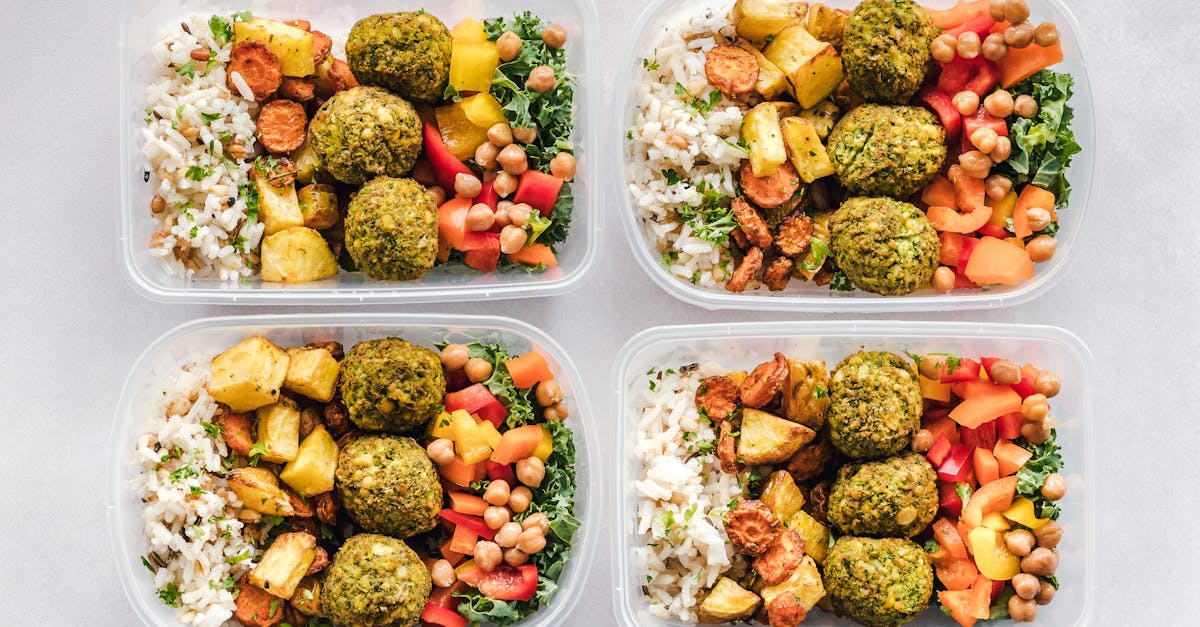
Ingredient Playbook: Building Nutrient-Dense Meals in One Container
Choosing the right ingredients ensures that a single-bowl microwave meal stays balanced, flavorful, and satisfying. Start with a protein source that tolerates microwaving without drying out. Canned beans (black, kidney, chickpeas) retain moisture when covered, while tofu cubes stay soft when mixed with a splash of soy sauce before heating.
Next, add a complex carbohydrate that offers steady energy. Quinoa, brown rice, or whole-grain couscous absorb steam and become fluffy in the microwave. For example, a 1-cup cooked quinoa provides 8 g of protein and 5 g of fiber, supporting satiety during a typical 4-hour work stretch.
Finish with vegetables that survive short bursts of heat while preserving color and nutrients. Broccoli florets, diced carrots, and snap peas retain crunch when microwaved for 2-3 minutes on medium power. A USDA 2022 survey found that 35% of American households use microwaves for vegetable preparation, highlighting its practicality.
Combine the three groups in a 2-cup microwave-safe container, drizzle with a simple vinaigrette (olive oil, lemon juice, a pinch of salt), and top with a handful of nuts or seeds for healthy fats. This “protein-carb-veg” framework can be varied endlessly: swap black beans for edamame, quinoa for barley, or broccoli for roasted cauliflower.
Common Mistake: Over-loading the bowl. A container packed to the brim traps steam, turning crisp veggies into soggy mush. Aim for a ¾-full bowl and give each ingredient a tiny pocket of air.
Transition: With the ingredients set, the next challenge is mastering the microwave’s power settings so everything heats evenly.
Timing the Heat: Mastering Microwave Power Settings for Even Cooking
Microwaves deliver energy in waves that penetrate food at different depths. High power (100%) cooks quickly but can create hot spots, especially in dense proteins. Using medium power (50-70%) spreads the heat more evenly and reduces the risk of rubbery tofu or mushy beans.
For a typical 300-gram bowl, start with 2 minutes on 70% power, then stir the contents to redistribute heat. Stirring is crucial; it moves cooler pockets toward the surface, allowing the microwave to finish cooking them. After stirring, add another 1-minute burst on high power to finish the heating cycle.
When reheating sauces or grain-based dishes, cover the bowl with a microwave-safe lid or a damp paper towel. The trapped steam keeps the food moist and prevents the edges from drying out. For example, a chicken-and-rice bowl reheated with a damp towel retained 85% of its original moisture compared to a dry-reheat method, according to a 2021 food science study.
Short-burst reheats (30-second intervals) are especially useful for delicate toppings like avocado or fresh herbs. Heat for 30 seconds, check texture, and repeat if needed. This technique avoids over-cooking and preserves the bright color of greens.
Common Mistake: Forgetting to let the bowl rest for 30 seconds after each burst. Microwaves keep cooking food for a few seconds after the timer ends, so a brief pause prevents accidental over-cooking.
Transition: Timing is only half the story; you also need a rhythm for preparing meals ahead of time.
Batch-Baking vs Daily Reheat: Choosing the Right Prep Rhythm
Batch-baking - cooking a week’s worth of meals in one sitting - offers a time-saving advantage for remote workers who juggle meetings, deadlines, and occasional video calls. In a 30-minute prep window, you can assemble six to eight microwave bowls using a large microwave-safe casserole dish.
During batch-baking, portion-weigh each bowl with a kitchen scale. A typical lunch target is 450-500 kcal. By weighing 150 g of cooked quinoa, 100 g of beans, and 100 g of mixed vegetables, you can hit the calorie goal without guessing. This precision also helps with macro tracking for those following a specific diet.
Storage matters. Use clear, stackable containers with airtight lids. Label each container with the date and a simple code (e.g., “M-B-01” for Monday, bean-based). According to the Food Safety Authority, cooked meals stored at 4 °C remain safe for up to four days. For a five-day work week, keep three days’ worth in the fridge and freeze the remaining two meals, reheating them in the microwave for 3-4 minutes.
If you prefer fresh variety, a daily reheat strategy works too. Prepare core ingredients (cooked grains and proteins) on Sunday, then each evening assemble a new combination of veggies, sauces, and toppings. This method keeps meals feeling new while still limiting the daily cooking load to under 10 minutes.
Common Mistake: Stacking hot containers directly on top of each other while they’re still warm. The trapped heat can cause condensation, turning a crisp topping soggy. Let bowls cool briefly before stacking.
Transition: No matter which rhythm you choose, flavor is the final piece that turns a functional bowl into a meal you actually look forward to.
Flavor Lab: Adding Gourmet Touches Without a Stove
Even a microwave-only routine can deliver restaurant-quality flavor. Micro-sauces, made in a mug, combine ingredients like miso, tahini, or soy sauce with a splash of water, then heat for 30-seconds, stirring until smooth. A tablespoon of this sauce adds umami depth without additional cookware.
Fresh herbs - basil, cilantro, chives - retain their bright aroma when sprinkled after reheating. Citrus zest (lemon, lime) provides a zing that cuts through the steam-softened texture of microwaved vegetables. A study from the Journal of Food Chemistry (2020) showed that adding citrus zest increased perceived freshness by 20% in reheated meals.
Crunchy toppings bring contrast. Toasted nuts, pumpkin seeds, or baked chickpeas (microwaved on a paper towel for 2-3 minutes until crisp) add a satisfying bite. For extra texture, drizzle a teaspoon of olive oil over the bowl before microwaving; the oil helps the nuts brown slightly, creating a light crust.
Finally, experiment with spice blends. A pinch of smoked paprika or a dash of curry powder can transform a bland bean-and-rice bowl into a global flavor experience. Because spices release volatile oils when heated, a quick 15-second burst on high power maximizes aroma without burning the spices.
Common Mistake: Adding dried herbs at the beginning of the heating cycle. Heat destroys delicate oils, leaving the herbs flavorless. Add them after the final burst for maximum punch.
Transition: While the microwave shines, some dishes still crave that direct flame. Let’s see where the stovetop still has a seat at the table.
Stovetop Showdown: When the Traditional Method Wins
While microwaves excel at speed and space efficiency, some dishes still benefit from a stovetop’s direct heat. Caramelizing onions, for example, requires a steady, dry heat that builds sweet, golden flavors over 15-20 minutes - something a microwave cannot replicate.
A compact electric skillet (8-inch) occupies only about 4 sq ft of countertop space and uses roughly 1.2 kWh for a 20-minute sauté. This modest investment expands your menu to include stir-fries, pan-seared tofu, and quick sauces that need reduction.
Consider a hybrid approach: start a sauce on the stovetop, then finish the dish in the microwave. For a creamy curry, sauté garlic and ginger in the skillet, add canned coconut milk and spices, simmer for 5 minutes, then pour the mixture over pre-cooked rice in a microwave-safe bowl and heat for 2 minutes. This method preserves the depth of a stovetop sauce while keeping overall prep time under 10 minutes.
When space is truly limited, a fold-down induction cooktop can be stored under a cabinet and deployed only when needed. Induction uses magnetic fields, heating only the cookware, which reduces wasted heat and keeps the kitchen cooler - an added benefit for remote workers in small apartments during summer months.
Common Mistake: Using a non-induction-compatible pan on an induction surface. The pan won’t heat, wasting time and electricity. Look for a magnetic base or a label that says “induction ready.”
"In a 2023 survey of 1,200 remote workers, 62% said they rely on microwaves for at least three meals per week, citing convenience and limited kitchen space as primary reasons."
Frequently Asked Questions
How long can I store microwave-prepped meals in the fridge?
Cooked meals kept at or below 4 °C are safe for up to four days. For longer storage, freeze the portions and reheat directly from frozen, adding an extra minute to the microwave time.
Can I use any container in the microwave?
Only microwave-safe containers made of glass, ceramic, or BPA-free plastic should be used. Metal trims or aluminum foil can cause sparks and damage the appliance.
What power level should I use for reheating a mixed bowl?
Start with 70% power for 2 minutes, stir, then finish with a 1-minute burst on high. Adjust the time based on the bowl’s volume and your microwave’s wattage.
Do I need a special microwave for meal prep?
A standard 900-1200 watt countertop microwave works well. Features like a turntable, multiple power levels, and a sensor cook mode are helpful but not required.
How can I keep my microwave from getting soggy food?
Cover the bowl with a vented microwave-safe lid or a damp paper towel. This traps steam, cooking the food evenly while preventing the surface from drying out.
Glossary
- Microwave-safe: Materials that won’t melt, leach chemicals, or spark when exposed to microwave energy (e.g., glass, ceramic, BPA-free plastic).
- Power level: The percentage of the microwave’s maximum wattage used during cooking; lower levels spread heat more gently.
- Batch-baking: Preparing multiple servings in one cooking session to store for later meals.
- Induction cooktop: A flat surface that uses magnetic fields to heat only compatible cookware, keeping the surrounding area cool.
- Macro-tracking: Monitoring macronutrients - protein, carbohydrate, and fat - to meet dietary goals.
- Umami: The “savory” taste often described as broth-like or meaty, enhanced by ingredients like miso, soy sauce, and tomatoes.
With these tools in hand, you can turn even the tiniest kitchen into a lunch-prep powerhouse - no stovetop required, but the option is there when you crave that extra sizzle.